In this post, we’re going to look at how to secure our servers and clients using TLS (Transport Layer Security). As we all know, web servers and clients communicate with each other through the HTTP protocol. HTTP can be secured through TLS resulting into what is commonly known as HTTPS.
Before we write any code, it’s imperative to give ourselves a brief introduction to TLS. The topic of security is massive and it takes whole books to cover, so we will just look at the most vital nuggets of knowledge that are needed to get us started.
Introduction to TLS
TLS (Transport Layer Security) is a protocol designed to provide a secure channel between two communicating peers that keeps user data secure, verify ownership of the website, prevent attackers from creating a fake version of the site, and gain user trust.1
TLS uses the Diffie-Hellman Key Exchange and its new revision incorporates a few substantial changes such as a new message flow and a focus on strong cryptography.
A normal TLS handshake requires at least two RTTs (Round-Trip Time), and it always gets worse when the certificates are verified. In an attempt to improve the latency of TLS, Google introduced and deployed in its Chrome browser an optimistic technology known as False Start in 2010. The idea of TLS False Start was to have a client start sending application data immediately after having sent its FINISHED message to the server. It’s implementation was difficult, but in the latest version the message flow was simplified and streamlined considerably.
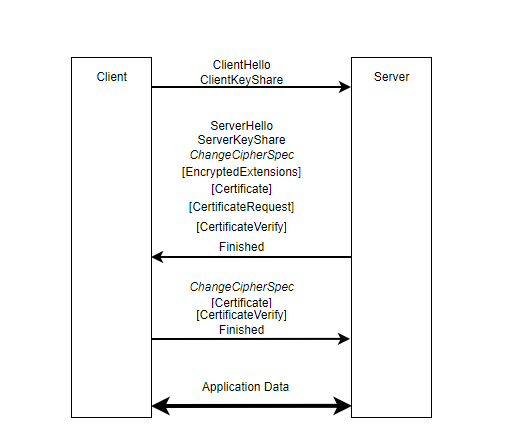
In TLS 1.3, there are only three flights that are needed to set up a TLS connection, as illustrated in the diagram below. In secure connections, after a TCP handshake is done, the server and client perform a TLS handshake to agree on a shared secret ChangeCipherSpec that’s unique only to them and to this particular session. This shared secret key is then used to securely encrypt all data being exchanged between them. Once the handshake is complete, the client and server can start using the now established TLS connection to exchange application data in a secure way.

Certificates
In the diagram above, you’ll notice that the server sends a certificate to the client as part of its first ServerHello message. These are known as X.509 certificates as defined in the RFC 5280 document.
Asymmetrical cryptography plays a key role in TLS. Clients and servers agree on a shared encryption key (session key or shared secret) to initiate a handshake whereby the client indicates its intent to start a communication session with the server. Typically, this entails agreeing on some mathematical details on how the encryption occurs. The server then replies with a digital certificate.
A digital certificate is a digital document that gets issued by a trusted third-party entity known as a certificate authority (CA). For instance, let’s say you want to communicate with https://somebank.com - how do you know it’s really Some Bank asking for your password and not some attacker intercepting your connection which is known as a MITM (man-in-the-middle attack). Certificates are meant to prevent this scenario.
A web client typically contains a list of CAs that it knows of. So, when the client attempts to connect to a web server, the server responds in turn with a digital certificate. The client looks for the issuer of the certificate and compares the issuer with the list of CAs that it knows of. If the client knows and trusts the certificate issuer, then it will continue with the connection to the server and use the public key in the certificate. Modern browsers have a list of pre-trusted CAs built-in. Since attackers cannot forge a trusted certificate’s signature, they cannot impersonate Some Bank.
Generating Self-Signed Certificates
Go’s standard library has excellent support for everything related to crypto, TLS and certificates, but for purposes of demonstration we’ll use OpenSSL. To create self-signed certificates, proceed as follows:
Create a directory where the certificates will be stored and use the OpenSSL command to generate public and private keys as follows:
mkdir certsopenssl req -x509 -nodes -days 365 -newkey rsa:2048 -keyout certs/localhost.key -out certs/localhost.crtIn the questionnaire that follows, make sure you qualify
localhostas your hostname as shown below:

In doing so, two files will be generated as follows:
localhost.crt
localhost.key
Now that we have the certificate and private key in hand, we are ready to build our HTTPS server. So, let’s go ahead and do that.
The standard library
There’s a lot of debate among developers especially those who are just starting out with a particular language around the question “what framework should I use to do X”. While it makes total sense for web applications and servers in many languages, in Go the answer to this question is nuanced. There are strong opinions both for and against frameworks.
Frameworks are cool and make your work easier, but they are not extremely reliable nor important. As an engineer it’s important to think things through first principles. This means that you should be able to understand concepts from the core principles level and you should be able to build or derive frameworks from scratch. Some of the issues arising from using frameworks include blowing coding interviews, high security risks at production level, team scalability problems and lack of support thus it’s not advisable to depend on frameworks.
Anatomy of a HTTP Server in Go

The code:
func main() {
addr := flag.String("addr", ":8080", "HTTP network address")
cert := flag.String("certfile", "certs/localhost.crt", "certificate PEM file")
key := flag.String("keyfile", "certs/localhost.key", "key PEM file")
flag.Parse()
infoLog := log.New(os.Stdout, "INFO\t", log.Ldate|log.Ltime)
errorLog := log.New(os.Stderr, "ERROR\t", log.Ldate|log.Ltime|log.Lshortfile)

mux := http.NewServeMux()
mux.HandleFunc("/", func(w http.ResponseWriter, r *http.Request) {
	if r.URL.Path != "/" {
		http.NotFound(w, r)
		return
	}
	fmt.Fprintf(w, "Served with Go and HTTPS\n")
})

tlsConfig := &tls.Config{
	MinVersion: tls.VersionTLS13,
	PreferServerCipherSuites: true,
	CurvePreferences:         []tls.CurveID{tls.X25519, tls.CurveP256},
}

srv := &http.Server{
	Addr:         *addr,
	ErrorLog:     errorLog,
	Handler:      mux,
	TLSConfig:    tlsConfig,
	IdleTimeout:  time.Minute,
	ReadTimeout:  5 * time.Second,
	WriteTimeout: 10 * time.Second,
}
infoLog.Printf("Starting server on %s", *addr)
err := srv.ListenAndServeTLS(*cert, *key)
errorLog.Fatal(err)
}
This code serves a single handler on the root path and takes ListenAndServeTLS call to the cert and key files path. The difference with a HTTP server is about 10 lines of code. The bulk of the server’s code is completely oblivious to the underlying protocol and won’t change.
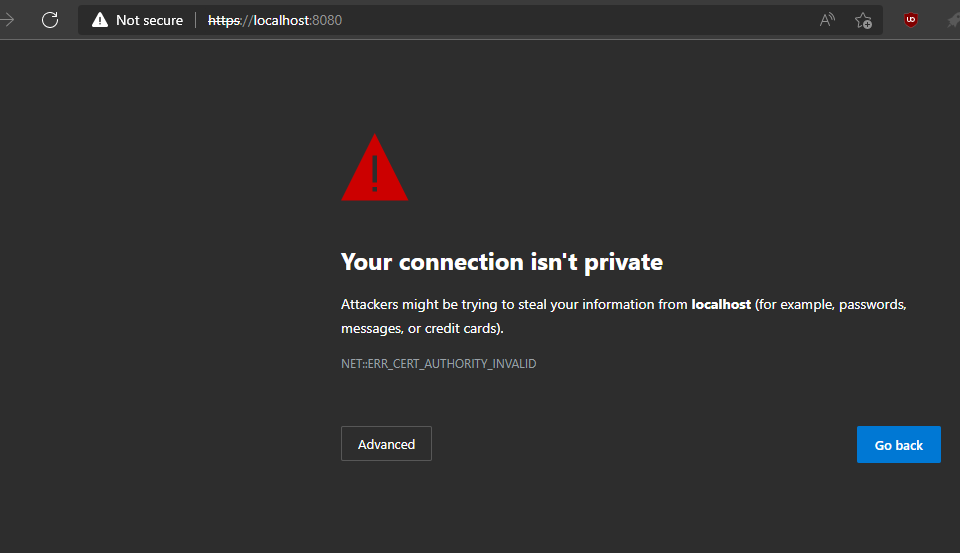
With this server running locally and serving on port 8080, the browser will initially balk when accessing it:

This is because a browser will not, by default accept a self-signed certificate. As mentioned earlier, browsers come with a hard-coded list of CAs they trust and our self-signed certificate is obviously not one of them. We could still access the website albeit grudgingly by clicking Advanced and then allowing Chrome to go on, but the address bar will still show us a “Not secure” sign.
If we try to curl to the server, we’ll also get an error:

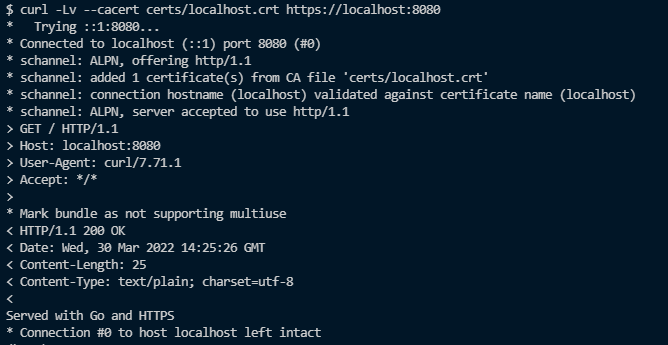
In the curl docs, curl can be made to trust our server by providing it with the server’s certificate with the --cacert flag. If we try that:

Success!
Other options for generating certificates
Go comes with a tool for generating self-signed TLS certs right in its standard installation. If you have Go installed, you can run this tool with:
go run %GOROOT%/src/crypto/tls/generate_cert.go
Here, %GOROOT% represents your Go root environment variable.
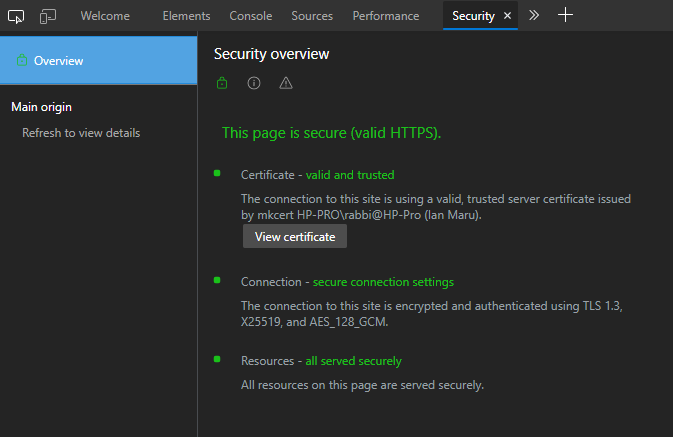
Besides that, there’s also the mkcert tool. It creates a local CA and adds it to your system’s trusted list of CAs. It then generates certificates signed by this authority for you, so as far as the browser is concerned, they’re fully trusted.
If we run our simple HTTPS server after using the mkcert tool, the browser will happily access it without warnings. We can see the details in the Security tab of the developer tools:


curl will also be able to access the host without needing the cacert flag because it checks the system’s trusted CAs already.
If you’re looking for real certificates for production-grade applications, Let’s Encrypt (https://letsencrypt.org) is a natural option. You can then use Go libraries like certmagic to automate interaction with Let’s Encrypt.
Client Authentication (Mutual TLS Authentication)
So far we’ve looked at proving the server’s legitimacy by providing it with a certificate but what about the client?
The idea is easy. You simply extend mutual authentication where the client also has a signed certificate to prove its identity. In the world of TLS, this is called mTLS (for mutual TLS), and is more applicable in settings where internal services have to communicate with each other securely. Servers can be instructed to set up TLS sessions with only authenticated clients. These clients cannot use the certificates that we have generated previously, but ones which we create.
Generating Certificates for Authentication
Go’s standard library contains everything that we need to generate our own certificates using the elliptic curve digital signature algorithm (ECDSA) and the P-256 elliptic curve. Here’s how to do that. In your certs directory created earlier, create a new file and name it generate.go. Add this code in the file:
func main() {
    addr := flag.String("host", "localhost", "Network Address")
    certFile := flag.String("cert", "cert.pem", "certificate file name")
    keyFile := flag.String("key", "key.pem", "private key file name")
    flag.Parse()

   serial, err := rand.Int(rand.Reader, new(big.Int).Lsh(big.NewInt(1), 128))
    if err != nil {
        log.Fatal(err)
    }
    notBefore := time.Now()
    template := x509.Certificate{SerialNumber: serial,Subject: pkix.Name{
        Organization: []string{"Some Bank"},
    },
    NotBefore: notBefore,
    NotAfter: notBefore.Add(10 * 356 * 24 * time.Hour),
    KeyUsage: x509.KeyUsageKeyEncipherment |
        x509.KeyUsageDigitalSignature |
        x509.KeyUsageCertSign,
    ExtKeyUsage: []x509.ExtKeyUsage{
        x509.ExtKeyUsageServerAuth,
        x509.ExtKeyUsageClientAuth,
    },
    BasicConstraintsValid: true,
    IsCA: true,

    for _, h := range strings.Split(*host, ",") {
        if ip := net.ParseIP(h); ip != nil {
            template.IPAddresses = append(template.IPAddresses, ip)
        } else {
            template.DNSNames = append(template.DNSNames, h)
        }
    }
    priv, err := ecdsa.GenerateKey(elliptic.P256(), rand.Reader)
    if err != nil {
        log.Fatal(err)
    }
    der, err := x509.CreateCertificate(rand.Reader, &template,
        &template, &priv.PublicKey, priv)
    if err != nil {
        log.Fatal(err)
    }

    cert, err := os.Create(*certFile)
    if err != nil {
        log.Fatal(err)
    }
    err = pem.Encode(cert, &pem.Block{Type: "CERTIFICATE", Bytes: der})
    if err != nil {
        log.Fatal(err)
    }
    if err := cert.Close(); err != nil {
        log.Fatal(err)
    }
    log.Println("wrote", *certFile)
    key, err := os.OpenFile(*keyFile, os.O_WRONLY|os.O_CREATE|os.O_TRUNC, 10600)
    if err != nil {
        log.Fatal(err)
    }
    privKey, err := 2x509.MarshalPKCS8PrivateKey(priv)
    if err != nil {
        log.Fatal(err)
    }
    err = pem.Encode(key, &pem.Block{Type: "EC PRIVATE KEY",
    Bytes: privKey})
    if err != nil {
        log.Fatal(err)
    }
    if err := key.Close(); err != nil {
        log.Fatal(err)
    }
    log.Println("wrote", *keyFn)
}
This code creates a command-line utility to generate your own certs. Let’s use it. In your project directory, run this command:
go run generate.go -cert servercert.pem -key serverkey.pem -host
go run generate.go -cert clientcert.pem -key clientkey.pem -host localhost
This should generate separate certificates/keys for the client and server.
Running the mTLS server:
$ go run main.go
2020/06/18 14:30:43 Starting server on :8080
Create a client.go file and add the following code:
func main() {
addr := flag.String("addr", "localhost:8080", "HTTPS server address")
certFile := flag.String("certfile", "certs/servercert.pem", "trusted CA certificate")
clientCertFile := flag.String("clientcert", "certs/clientcert.pem", "certificate PEM for client")
clientKeyFile := flag.String("clientkey", "certs/clientkey.pem", "key PEM for client")
flag.Parse()

// Load our client certificate and key.
clientCert, err := tls.LoadX509KeyPair(*clientCertFile, *clientKeyFile)
if err != nil {
	log.Fatal(err)
}

// Trusted server certificate.
cert, err := os.ReadFile(*certFile)
if err != nil {
	log.Fatal(err)
}
certPool := x509.NewCertPool()
if ok := certPool.AppendCertsFromPEM(cert); !ok {
	log.Fatalf("unable to parse cert from %s", *certFile)
}

client := &http.Client{
	Transport: &http.Transport{
		TLSClientConfig: &tls.Config{
			RootCAs:      certPool,
			Certificates: []tls.Certificate{clientCert},
		},
	},
}

r, err := client.Get("https://" + *addr)
if err != nil {
	log.Fatal(err)
}
defer r.Body.Close()

html, err := io.ReadAll(r.Body)
if err != nil {
	log.Fatal(err)
}
fmt.Printf("%v\n", r.Status)
fmt.Printf(string(html))
}
On another terminal tab, run this command:
$ go run client.go
You should get the following response:

Conclusion
While this demonstrates how to run TLS servers, there’s still a lot more to do with regards to certificate management, renewal and revocation, and trusted CAs. All this bundled up is called the Public-Key Infrastructure (PKI) and the mechanics of it all is well beyond the scope of this post.
Thank you for reading.
IETF gave a definition of TLS when 1.3’s (version 3,4) was submitted in 2018. ↩︎